So, the best way to manage your any account is constant posting from time to time. As you might have heard this phrase “Consistency is the key”. But being consistent on Instagram sometimes sure gets tough. So, here’s where this article comes to your rescue! As in this article, we will teach you how you can easily schedule your post on Instagram, and then it will get posted automatically without any hassle or manual work. So, if you are a busy bee but want the perfect consistency on your account to not disappoint your audience then just follow the steps that are mentioned down below.
How to schedule Post on Instagram (for business profile):
Step 1: Convert your account to a business profile:
Aside from direct publishing, business profiles on Instagram can access some useful advanced features. For instance, Instagram insights will show you when your followers are online, also what city they live in, their age, and gender. These factors will help you to promote your products with better details about your target audience. Also, you get a contact button in your profile which makes it easy for your consumers to reach you.
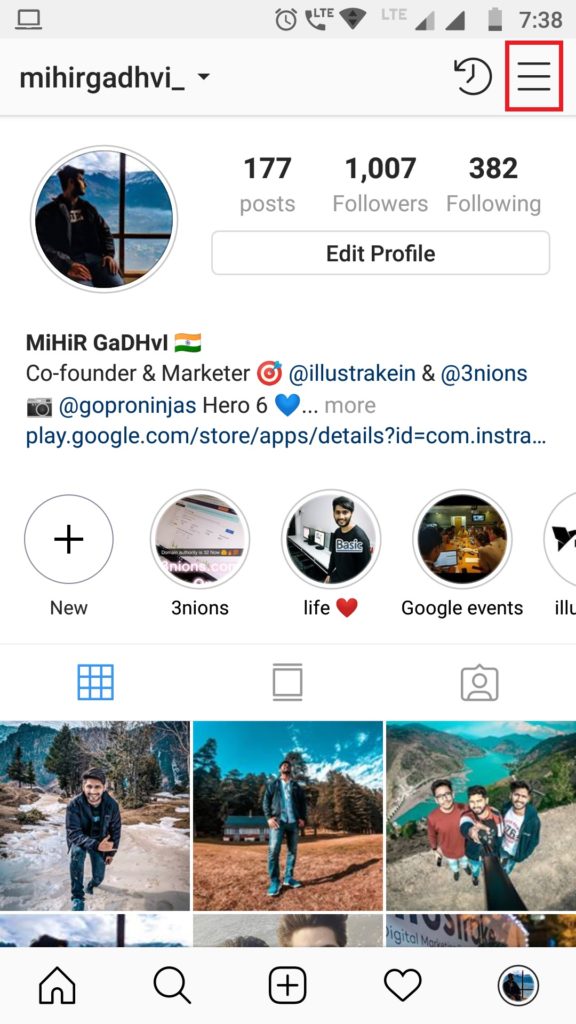
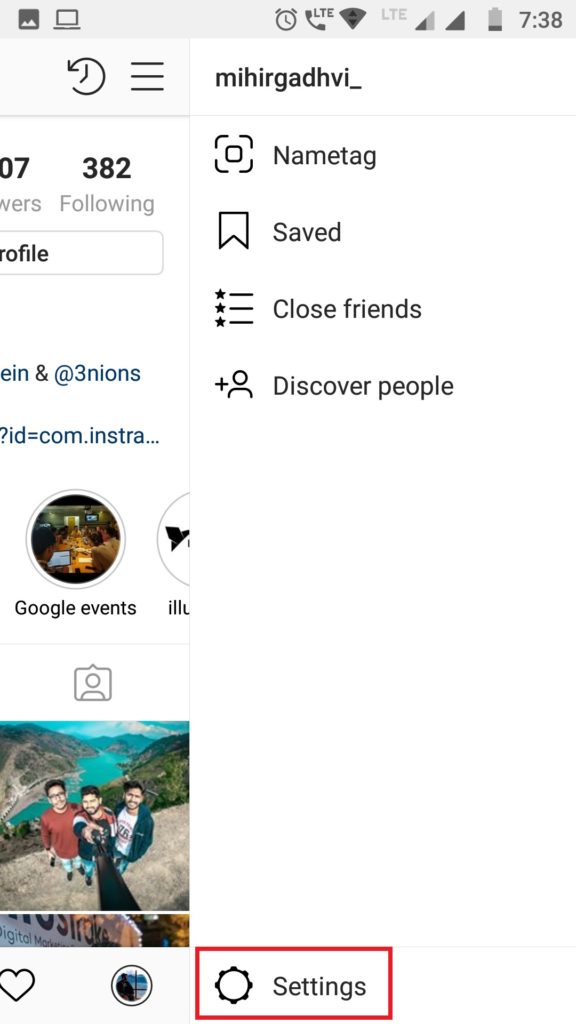


Go to your Instagram profile and tap on the three horizontal lines from the right-hand side corner.
Now go to “Settings” and click on the option of ‘Switch to Business Account’.
Instagram will then prompt you to connect to a Facebook business page ( you need to have admin access to the Facebook page or you can create one new).
After selecting a page, choose a category for your business so that people know what your business is about.
Fill out your contact details (email address, phone number, and address). You need to fill out at least one of these.
Next, tap done! And just like that your Instagram account is now converted to a business profile.
Note: For letting this process to work, make sure your Instagram account is set to public.
Step 2: Add your Instagram account to the Hootsuite application:
Install and open the
Hootsuite application from Google Play Store.
Sign up or log in with your Facebook, Google, or directly from your email account.
Next, tap on the profile icon and select “Add Social Network”.
After that tap on the “+” sign from the upper right corner.
Then you will get a number of social media options, tap on “Connect to Instagram”.
Next, enter your credentials and log in.
That’s it now your Instagram profile is added to Hootsuite.
Step 3: How to schedule your post:

Once your Instagram account is linked with Hootsuite application, now go main menu and tap on “Streams”.
Then you will get two options, My Posts, and Scheduled Posts. Tap on “Scheduled Posts” and click on the create icon from the bottom right corner. (In “My posts” you will see the Instagram posts of your added account).
Now, select your account and then normally as you post, write the caption, add a location, and then add the image or video.
Tap on “Next” and then you will get three options, Send Now, Auto-Schedule, Custom Schedule. Now for scheduling your posts, either click on “Auto schedule” or “Custom schedule”.
If you tap on Custom schedule, you will get a calendar to set the date and then a clock to set time. But if your option is Auto schedule, then the application will itself schedule it on the best date and time as per your profile engagement.
If you want to edit or delete your scheduled posts you can still do it, by tapping on “View in Publisher, and then you will get the said options at the bottom of your screen.
Note: If you’re publishing an album of photos or video, you’ll still need to manually complete the posting process when the time comes.
That’s it, now with the above-mentioned steps, you can easily schedule your Instagram posts on your preferred date and time. So, no more hovering over your phone and waiting for the right time to come! As now you can custom your own timing and set whichever suits you the best. But if you’re confused, then don’t worry let the application pick the perfect timing for you.
Sponsor ads:
Gihosoft Free iPhone Data Recovery:
https://www.gihosoft.com/iphone-data-recovery-free.htmlGihosoft iPhone Data Recovery Free
Free iPhone Data Recovery Software for Windows/Mac
Recover up to 12+ types of files, including contacts, SMS, photos, WhatsApp, Viber, notes, etc.
Restore lost data from iOS devices directly or from iTunes and iCloud backup
Recover iPhone data lost due to iOS upgrade/jailbreak, accidental deletion, device lost or broken
Support all the latest iPhone, iPad and iPod Touch
Both Free and Pro version.
If you lost data after you updated to a new iPhone, you can always use
Gihosoft iPhone Data Recovery to get the data back from the old iPhone or backup.You may also like:
iphonerecovery.comIf you use android phones, please choose
Gihosoft Android Data Recovery.
With Gihosoft Android Data Recovery, no longer afraid of data loss!
Must read:
Youtube video downloader for pc Gihosoft RePicvid Free Photo Recovery Software provides a free photo recovery software for windows to help users recover the deleted or lost photo for free.
Jihosoft Android Data Recovery: the best Android Data Recovery software for Windows and Mac to recover deleted contacts, messages, photos, videos, WhatsApp and etc from Android devices.Tips:
How to transfer messages from iPhone to iPhone jihosoft Free iPhone Data Recovery