2019/07/23

16-Inch MacBook Pro Could Launch in October


It is a well-known secret that Apple is prepping a bigger 16-inch MacBook Pro. According to Economic Daily News, sources in the supply chain predict 16-inch MacBook Pro is expected to be released in October.

The report also reveals that the new MacBook Pro will come equipped with a 3,072 x 1920 resolution LCD manufactured by LG. As far as production is concerned, the new MacBook is likely to be manufactured by Quanta and Foxconn. Furthermore, the report also hints at a refreshed MacBook Pro 13-inch and MacBook Air, both arriving in October. The latest report corroborates with the previous one.

Apple has updated the 13-inch and 15-inch MacBook Pro in May. The chances are that Apple might not update the Pro models so soon. Apple has rarely refreshed MacBook lineup two times in a year. This also gives rise to a much important question. Will the new 16-inch MacBook Pro replaces the 15-inch variant or whether it will be sold alongside the 15-inch variant? So far there is no mention of 15-inch MacBook Pro in the report, however, it is quite likely that Apple might release the 15-inch laptop at a much later date.

The reports about upcoming MacBooks are trickling in as we near the launch. This month a report elucidated that Apple will be ditching the butterfly keyboard on new MacBooks in favour of scissor keyboard. The move is aimed at solving never-ending issues that plague butterfly keyboards.

Apple typically hosts a Mac event in October and if the reports are to be believed, the 16-inch MacBook Pro will be launched at the event. All said and done, the 16-inch MacBook Pro seems to be real and will soon see the light of the day. Lastly, the report mentions that 16-inch MacBook Pro is likely to be priced at $3000.Also read:Filmlinks4u Alternatives

Also read:best android mmorpg
[via Economic Daily News]

2019/05/21

How to Delete Apple ID from iPhone/iPad by Using iTunes(Data Loss)


How to Delete Apple ID from iPhone/iPad by Using iTunes(Data Loss)

If you want to use the default App provided by Apple to remove the Apple ID from the device then you can follow the steps shown below. This app requires the availability of iTunes on the computer and even some of the other requirement need to be fulfilled to make this work. Some of the requirement are: "Find my iPhone" should not be turned on and the device should not be synced before with the iTunes.

Process on how to delete Apple ID from iPhone/iPad without password using iTunes:

1. Connect your iPhone/iPad to computer and open iTunes.

2. Now force restart your iPhone: Press & instantly leave "Volume Up" button, again press & instantly leave volume down button and then press & hold "Power" button until you don't see recovery mode on screen.


3. Instantly you will see a message box on the screen which says "There is a problem with the iPhone "iPhone name" that requires it to be updated or restored". Click on "Restore" option to reset the iPhone.


Part 3: How to Erase Apple Account on Web

If are planning to delete your account for any reason then you can easily delete it from the web. Though you have an option to temporarily deactivate the account in case you want to use in future but make sure to take the decision wisely because once the account has been deleted it cannot be restored and you will not be able to access iTunes or take advantages of any of its services.

Process to delete Apple Account from the web:

1. First you need to visit Apple data & privacy login page.


2. Next enter the Apple ID and log-in to account that you want to delete. Once you are inside the home page, click on "Request" to delete your account (which you can see on the bottom of the screen).


3. Then check whether you have any subscriptions with the Apple ID or not and then select a reason for deleting the account. Click "Continue" to proceed further.Also Read:10 Websites to Watch Indian Live Television

Chuwiには、カスタマイズされたラップトップ、タブレットPC、妥協のない品質、安定性、サポート、パフォーマンスを備えたミニノート pcエクスペリエンスの世界有数のテクノロジーパートナーになることをミッションがあります。


4. Finally follow the onscreen procedure to delete the Apple ID account permanently.
Part 4: Using "No longer have your iPhone" to Disable Apple ID(Data Loss)

This method might looks unusual to many of the users as it has some weird technique to disable Apple ID. The process is simple and easy but you need to follow the steps as shown below to make this method work. This solution might not be reliable as the first one but still you can learn how to use this solution.

1. You need to visit Apple website using any browser and then search and locate "No longer have your iPhone" from its main screen.


2. Now enter your phone number and click on "Send Code" to receive 6-digits verification code. Once you receive the code, enter into the second fill-up-box and click on "Submit" button. Soon your Apple ID will be deleted.

Sponsor ads:

Gihosoft RePicvid Free Photo Recovery Software provides a free photo recovery software for windows to help users recover the deleted or lost photo for free.

If you lost data after you updated to a new iPhone, you can always use Gihosoft iPhone Data Recovery to get the data back from the old iPhone or backup.You may also like: iphonerecovery.com

If you use android phones, please choose Gihosoft Android Data Recovery.With Gihosoft Android Data Recovery, no longer afraid of data loss!

iPhone Manager:Get the ultimate Gihosoft iPhone Manager. Free download for PC/Mac.

2019/04/30

How to Use Spotify on Apple Watch


In November 2018, Spotify released an official app for Apple Watch that allows Spotify subscribers to access and control their favorite Spotify music and podcasts from their wrist. This article shows you how to get the Spotify app up and running on Apple Watchand explains how the interface works.


What the Spotify App for Apple Watch Can't Do

As great as it is that Spotify released an Apple Watch app, it does have a couple of major shortcomings that you should be aware of. As of writing, the app offers no option to store music locally on your wrist for offline listening. So if you were hoping to pre-load your watch with tunes from Spotify for your workout, you're out of luck.


Unfortunately, it's a similar story for Apple Watch LTE owners with a data contract who were hoping to stream Spotify music directly from their wrist for listening on a pair of connected Bluetooth headphones. Currently the ability to do this doesn't exist in the Spotify app and there's a good chance it never will, since Apple's API for watchOS 5 doesn't permit third-party apps to use direct cellular or Wi-Fi streaming.


With those limitations in mind, below are the steps you need to take to get the Spotify app to show up on your Apple Watch, followed by a brief guide on using the wrist-based interface.


How to Install Spotify on Apple Watch

These steps will work for both free and premium Spotify users. Just make sure you have the latest version of Spotify installed on your iPhone by checking the App Store for updates to the Spotify app.


Launch the Watch app on your iPhone.


In the My Watch tab, under the heading Installed on Apple Watch, check that Spotify appears in the list. If you can't see it, scroll down to the Available Appssection and tap the Install button next to Spotify.


After it's installed, select the Spotify app from your Apple Watch's Home screen. Alternately, open the Spotify app on your iPhone and it should automatically launch on your wrist.
How to Use the Apple Watch Spotify Interface

On Apple Watch, the main screen of the Spotify app provides you with regular playback functions. The three middle buttons let you play/pause and skip forward/back the track that is currently playing, while the track's title scrolls along the top.

To the right of the heart icon is a Spotify Connect button. Tapping this takes you to a list of available audio devices that you can connect to, such as your iPhone or Bluetooth/AirPlay speakers that are in range.


If you swipe right on the main screen you'll see a list of your recently played music on Spotify. You can use the Digital Crown or your finger to scroll through this list, and tap a playlist or album to play it.

As it stands, you can't use the Apple Watch app to select individual songs to play – you have to skip through tracks to get to the one you want to listen to. Alternately, you can turn on shuffle mode by toggling the switch at the top of the recently played screen.

Sponsor ads:

Gihosoft RePicvid Free Photo Recovery Software provides a free photo recovery software for windows to help users recover the deleted or lost photo for free.

If you lost data after you updated to a new iPhone, you can always use Gihosoft iPhone Data Recovery to get the data back from the old iPhone or backup.You may also like: iphonerecovery.com

If you use android phones, please choose Gihosoft Android Data Recovery.With Gihosoft Android Data Recovery, no longer afraid of data loss!

2019/04/22

Apple Seeds iOS 12.3 Beta 3 to Developers


In March, Apple officially released iOS 12.2 to the public. That software wasn’t a major upgrade, but it did welcome things like Apple News+ to the mix.

Now, Apple is moving ahead with betas for the next update to its mobile operating system. Today, Apple officially seeded the third developer beta of iOS 12.3. This is appears to be a minor update in scale, with the company focusing primarily on behind-the-scenes bug fixes and general overall improvements. However, the company did lay the groundwork for the public launch of its revamped TV app later this year with the first developer beta. Now, with the third beta, Apple will continue to tweak the formula to get it ready for the public.

If any additional discoveries are made, we will update this post accordingly.

To update, developers that have registered their supported iOS devices simply need to open Settings –> General –> Software Update and then follow the onscreen instructions.

Apple typically kicks things off with a developer beta, but a corresponding public beta of the same software will likely launch in short order. If you don’t want to wait for the public beta, and want to try out the developer beta –but you aren’t a developer yourself– you can do so for free by following the method through this link.Sponsor ads:

Gihosoft RePicvid Free Photo Recovery Software provides a free photo recovery software for windows to help users recover the deleted or lost photo for free.

If you lost data after you updated to a new iPhone, you can always use Gihosoft iPhone Data Recovery to get the data back from the old iPhone or backup.You may also like: iphonerecovery.com


How to Back Up Your iPhone and iPad


Creating an iPhone or iPad backup should be routine for most users, as it's a simple procedure and the easiest way to recover your data if your device is replaced, lost or stolen.


There are two types of backup available to iOS users. iCloud backups are encrypted automatically and stored in the cloud, and you can create and use them anywhere with a Wi-Fi connection. iTunes backups on the other hand are created and stored on your Mac or PC, encryption is optional, and you have to connect your device to your computer to restore one.Leer másG2a sitio


How to Create an iCloud Backup


Connect your iOS device to a Wi-Fi network.


Launch the Settings app.


Tap your name in the top banner.


Tap iCloud.


Tap iCloud Backup.


Toggle the iCloud Backup switch to the green ON position.


Tap Back Up Now and wait for the process to complete.

Once you've switched on the toggle next to iCloud Backup, your device will automatically back up each day, so long as the device's screen is unlocked and it's connected to a power source and a Wi-Fi network. Also make sure that you have enough available space in iCloud for the backup. iCloud comes with 5GB of storage for free, but most users will quickly eat that up. Fortunately, plans start at just $0.99 for 50GB of storage.Weiterlesen auoklicker


How to Create an iTunes Backup

The following step-by-step instructions on how to create an iTunes backup are given for iPhone, but apply to iPad and iPod touch too. The second set of steps shows you how to archive the backup if needed.


Connect your iOS device to a Mac or PC using a Lightning to USB cable.


Open iTunes.


Click the device's icon in the top-left menu.


Under Backups, click This computer.


Tick the Encrypt iPhone backup checkbox if you want to back up your login credentials and any Health and HomeKit data.


Click Back Up Now and wait for the backup process to finish. It will take around five minutes to complete depending on what's installed on your iPhone.
Archive the Backup

An archived iTunes backup saves the current state of your iOS device and prevents it from being accidentally overwritten by subsequent backups. Creating an archived backup is useful if for example you want to install a public beta of iOS, since if something goes wrong with the beta, you can use it restore your device to its previous operating system version. The following steps show you how to archive the iTunes backup that's created using previous steps.


Click iTunes -> Preferences… in the macOS menu bar.


Click the Devices tab.


Right-click (or Ctrl-click) the new backup, and select Archive from the contextual dropdown menu.

Backing up should be done on a a regular basis. If you're using iCloud, it will be done automatically, but if you're using iTunes, make sure to initiate a backup every week or two so you don't lose important data. Sponsor ads:

Gihosoft RePicvid Free Photo Recovery Software provides a free photo recovery software for windows to help users recover the deleted or lost photo for free.

If you lost data after you updated to a new iPhone, you can always use Gihosoft iPhone Data Recovery to get the data back from the old iPhone or backup.You may also like: iphonerecovery.com

2019/04/03

Here’s everything new in Android Q Beta 2 [Gallery]


Android Q Beta 2 is available today as an “incremental update” to the initial March release. We’re enrolling in the Beta Program and sideloading the OTAs right now to explore all the changes, so stay tuned to our updating (reverse chronological) list below.

While the first three Q releases are betas, Google’s focus is still on developers and identifying compatibility issues. The company is looking for feedback, with frequent changes and testing during this period.

This is the priority period in which to give us your feedback on features and APIs and file compatibility issues — for all of these, please use the issue tracker. You can expect some API changes across these updates.

For reference, here’s our everything new in Android Q Beta 1 from March.
How to enable ‘Bubbles’ for notifications using ADB


You may also like: Everything About Android 10 Q – Release Date, Name, and Features


Pixel 3 no longer shows wireless charging speed as ‘rapidly’ or ‘slowly’


Apps & notifications settings tweaks, new Notification Assistant

Your “Recently opened apps” are now displayed horizontally rather than as a list. Meanwhile, there is a new “Notification Assistant” that reads all alerts to “modify or dismiss notifications,” and can enable/disable DND.


Tighter Google account integration, new Android version page in Settings


Also Read: How to Update Your Current Android Version to the Latest Android 9.0 Pie


AOD: More prominent music notifications

Beta 1 noted what song and artist you’re listening to right under the Always-on Display clock. In Beta 2, currently playing is more prominently highlighted with the app icon and the song name on one line and the artist below. Meanwhile, the time is permanently shrunken down when music is playing as if it were an incoming notification.


Android Beta Feedback dark theme

A Play Store update to the Feedback app today adds a dark theme, “new flow to report app issues,” and “combined flow for feature requests and General Feedback.”


Useful tips: Gihosoft Free Android Data Recovery Software can help you fix all data loss issues! With it, you can recover deleted photos, videos, music, audios, and other files from your Android phones and tablets with original quality guaranteed.


‘Apps Permissions’ menu now ‘Permission Manager’


Media notifications now display a progress bar

In Beta 2, all media notifications include a progress bar with timestamps to quickly see the current playback state. This is especially useful for podcasts and other long form content. In supported apps like YouTube and YouTube Music, that bar doubles as a scrubber.


Also Read: How to Fix Delayed Notification Problem on Any Android Phone


Notification swipe actions


Image preview in Share sheet

When sharing an image, like a screenshot, the system Share menu now includes a small preview. The top corners of this sheet have also been rounded.


New battery icon

Android Q Beta 2 introduces a new battery icon that better conforms to the Material Theme. It features a thick, bolded outline so that the battery level inside is no longer edge-to-edge. It’s also present in the top-right corner of the Always-on Display.


Also Read: 10 Best Torrent Apps and Downloaders for Android in 2019 – No Speed Limits


Volume settings shortcut and pop-up panel in slider


Screenshots no longer show rounded corners or notch cutouts


Gestures now swipe between apps just like iOS
Bubbles

Bubbles are a new way to multitask in Android Q that can be expanded from their floating circular icon to reveal parts of the app. This includes messaging conversations, active phone calls, arrival times, notes, and other ongoing tasks or important updates. The Bubble APIs is built on top of Android notifications for easier implementation. When different apps are open, bubble icons will line themselves up in a row.


Also Read: How to Record Phone Calls/Conversations on Android for Free


Foldables

With the first Foldables launching in the coming months, Android Q is making sure apps can take “advantage of these new screens.” Beta 2 and Android Studio 3.5 includes a new foldable emulator in two hardware configurations: 7.3″ (4.6″ folded) and 8″ (6.6″ folded). The emulator provides on-screen controls to trigger fold/unfold, change orientation, and quick actions.

There are new platform features in Q, like improvements to onResume and onPause that support multi-resume and notify apps when it has focus. The resizeableActivity manifest attribute has been changed to better manage how apps are displayed on foldable and large screens.


Download Gihosoft Free Android Data Recovery Software


Sponsor ads:

Gihosoft Free iPhone Data Recovery:https://www.gihosoft.com/iphone-data-recovery-free.html

Gihosoft iPhone Data Recovery Free

Free iPhone Data Recovery Software for Windows/Mac

Recover up to 12+ types of files, including contacts, SMS, photos, WhatsApp, Viber, notes, etc.

Restore lost data from iOS devices directly or from iTunes and iCloud backup

Recover iPhone data lost due to iOS upgrade/jailbreak, accidental deletion, device lost or broken

Support all the latest iPhone, iPad and iPod Touch

Both Free and Pro version.

If you lost data after you updated to a new iPhone, you can always use Gihosoft iPhone Data Recovery to get the data back from the old iPhone or backup.You may also like: iphonerecovery.com

If you use android phones, please choose Gihosoft Android Data Recovery.

With Gihosoft Android Data Recovery, no longer afraid of data loss!

Must read:Youtube video downloader for pc

Gihosoft RePicvid Free Photo Recovery Software provides a free photo recovery software for windows to help users recover the deleted or lost photo for free.

Jihosoft Android Data Recovery: the best Android Data Recovery software for Windows and Mac to recover deleted contacts, messages, photos, videos, WhatsApp and etc from Android devices.Tips:How to transfer messages from iPhone to iPhone

Jihosoft File Recovery:Recover deleted, Lost, formatted, or corrupted files from PC, flash drive and memory card easily & safely

Also Read:Update Android

Also Read:Top 8 Best Alternative Websites to TamilGun in 2019

Also Read:Free Download FRP Bypass APK for Android 2019

Also Read:Best 10 Movie4k Alternative Websites for Movie Streaming 2019

Also Read:Top 32 Best Proxy and Mirror Sites to Unblock Fmovies 2019

Also Read:Best Torrent Search Engine Sites to Find Your Favorite Torrents 2019

Also Read:5 Best Sites Serving as Alternatives to TheWatchSeries Online 2019

2019/03/07

Top 7 Android Keyboards with a Number Row 2019


Typing numbers along with words is a bit of a challenge on a software keyboard. Typically, you will long press on the letters to type the number. Or you switch to the number layout on your phone's keyboard. However, the first one is time-consuming and the second one requires you to switch multiple times.


What if you could have a dedicated number row above the usual letters as available on a physical keyboard? That would make it easy to type numbers and alphabets swiftly.


But does every Android keyboard support it? No. Only some are gracious enough to feature a number row. Here are seven such keyboards for Android phones.
1. GBOARD


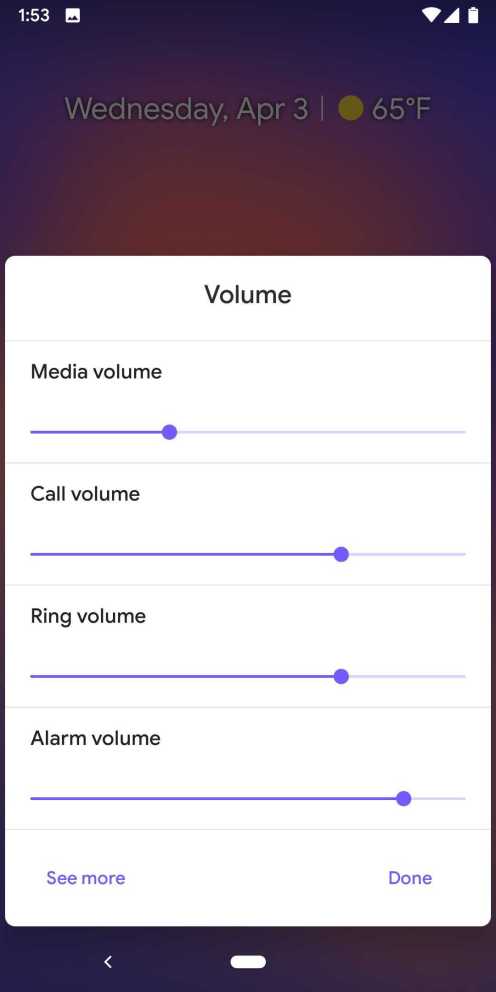
If you own a phone running stock Android, the chances are that your keyboard already has a number row. That’s because stock Android phones come pre-installed with Google’s Gboard.


You can enable/disable the number row by going to the keyboard Settings. Under Settings, tap on Preferences and turn the toggle on for Number row.Also Read:jihosoft Free iPhone Data Recovery


Sponsor ads:


Gihosoft Free iPhone Data Recovery:https://www.gihosoft.com/iphone-data-recovery-free.html


Gihosoft iPhone Data Recovery Free


Gboard is a free app that is downloadable on any phone. It is known for multiple language support, amazing word prediction, and a built-in Google search feature. The app also supports stickers, GIFs, emoji search, various themes for customization, and many other cool things.


Price: Free


Size: 75MB


Download Gboard
2. SWIFTKEY


SwiftKey is another popular keyboard that supports number row. It is one of the top competitors of Gboard, and both offer similar features.


You get multiple language support, emoji prediction, GIFs, search, and themes. SwiftKey has a slight edge over Gboard for it offers a native clipboard. But if you like Gboard more, the clipboard is coming to that as well. I prefer SwiftKey more as compared to Gboard because of it’s incredible word prediction and vertical scroll for emojis.


To enable the number row, go to the keyboard Settings and tap on Typing. Under Typing, tap on Keys and enable Number row.


Alternatively, enable the number row right from the shortcut settings available by tapping on Settings. The app also lets you customize the location of number pad in the symbols layout screen.


Price: Free


Size: 27MB


Download SwiftKey
3. CHROOMA


Chrooma is a beautiful adaptive keyboard app where the keyboard changes color according to the app you are using. One can call this app a beauty with brains. That’s because the number row is scrollable, better known as action row.


When you swipe right or left on the action row, the app will reveal more options that can be customized from the settings. You can have clipboard buttons, emoji row, word row, and custom letters row in it.


To enable number row, tap on the settings icon in the keyboard, then go to the Settings followed by Layout basic. Turn on Action Row.


Then tap on Configure Action Row and enable Number row and other options as per your wish.


The app is also known for gesture typing, night mode, a customizable QuickBar, clipboard, and proofreading. You also get GIFs and a search feature that automatically searches for all the text on the screen, unlike Gboard where you have to type the search query manually.


Size: 25MB


Price: Free with in-app purchases


Download Chrooma
4. AI.TYPE KEYBOARD


This app has everything that you typically look for in a keyboard app — starting from the pre-enabled number row to a native clipboard. The app also offers text shortcuts, arrow keys, touchpad, emoji art, multiple languages, auto correct, and more. You can customize both the top and bottom row as per your wish. When it comes to themes, while you get a number of them, you can create custom one too.


To hide number row, tap and hold the icon filled with dots present on the right side of the number row. Here uncheck Numeric. Tap the icon to change the top row items.


Size: 35MB


Price: Free with in-app purchases


Download ai.type Keyboard
5. GRAMMARLY KEYBOARD


You must have heard about Grammarly as a tool to check grammar online. Now the same tool is available as part of its keyboard app known as Grammarly. It is one of the few keyboards that offer a dedicated number row.


To show the number row, open Grammarly Settings and tap on Keyboard Look and Feel. Here enable Number row.


Sadly, Grammarly doesn’t offer as many features as the above apps, and it’s limited in terms of languages too. For themes also, you just get two options: light and dark. But if you want error-free writing with a number row, Grammarly is your buddy.


Size: 90MB


Price: Free


Download Grammarly
6. TOUCHPAL KEYBOARD


Disabled by default, TouchPal keyboard lets you activate the number row by tapping the TouchPal logo on the keyboard followed by NumRow Off.


The app also offers clipboard, arrow keys, emojis, and GIF. You also get emoji prediction and multiple language support. In comparison to Gboard and SwiftKey, the drawback is that the app comes with ads. To remove them, you have to switch to the premium version that gives the benefit of paid themes and cloud prediction as well.


Size: 40MB


Price: Free with ads


Download TouchPal Keyboard
7. ANYSOFTKEYBOARD


AnySoftKeyboard is a small keyboard that packs many features including a separate number row. To activate it, go to Settings (long press the emoji icon) followed by UI (color palette icon). Tap on 'Tweaks and more' and hit 'Common top generic row.' Here select Numbers keys.


With gesture support, the keyboard provides some customizations such as volume level, abbreviation editor, power-saving settings, and more. You can even use volume keys to navigate the cursor. While the keyboard doesn’t support GIF, it comes with an interesting feature that lets you hide emoji sections.


Size: 5MB


Price: Free


Download AnySoftKeyboard
LET THE NUMBERS SPEAK


Hope you liked the keyboards. Do give all a try and see which one suits your requirements. As mentioned before, I prefer to use SwiftKey for it has everything I want in a keyboard including a clipboard. Do let us know your favorite one too.


Must Check Out Posts:


Transfer WhatsApp Messages between Android and iPhone


The Best Mobile Keyboard Apps for Android in 2019


Samsung Stuck on Odin Mode? How to Exit?


Fix WeChat Login Errors


The Best Snapchat Like Face Filter AppsThe Best Android Backup Apps 2019How to Restart Android without Power Button


Jihosoft Photo Eraser


Erase unwanted objects and perfect your amazing photos!


Remove objects from photos with Photo Eraser is almost as easy as taking a shot. Now you can use this tool to erase undesirable objects from your pictures, such as tourists, watermarks, logos, texts, blemishes and other unwanted things without real photo-editing skills required at all.


Jihosoft Android Data Recovery


The most powerful and professional data recovery software for Android that can restore deleted or lost contacts, photos, videos, audios, SMS, call logs, WhatsApp chat, Viber messages from any Android devices due to accidental deletion, virus attack, formatting. It supports all popular Android smartphones and tablets like Samsung, HTC, LG, Huawei, Motorola, Nexus, etc. In the meantime, you will be guided step by step if you never used this kind of tool before.


The Best Power Supplies for 2023

  The Best Power Supplies for 2023  Here are some recommendations for the best power supplies in 2023: • Corsair RM/RMx Series - High-end 80...