We mostly use Gmail as our preferred email provider. Even those who rely on other means like IMAP email accounts of custom domains have a Google account and use Gmail in some capacity. With the number of emails that we get daily, it is easy to delete an email only to realize its importance later. So the question is how do you recover deleted emails? Backups.

A simple search on Google will tell you about the numerous horror stories where Gmail accounts of users were deleted. Another reason to take a backup is the high-profile hacks that the likes of Facebook, Microsoft, Google, and recently Quora, have faced in the past five years. So do you want to take your chances with Gmail? Here's what a famous fictional character said:
I know we’re not perfect, but the safest hands are still our own - Captain (America) Steve Rogers
Also Read:
How to Recover Deleted Contacts from GmailOkay, that's dramatic enough. Let’s get a bit serious and look at some of the ways by which you can take a backup of emails on Gmail.
1. THUNDERBIRD
There are many email clients available for desktop, but I will be using Thunderbird for this guide. Why? Because it simply works. Also, there is a portable version available for you to save all your data on a pen drive and view it offline.
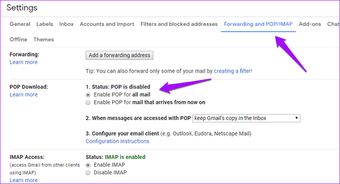
To take a backup of Gmail emails, go to Forwarding and POP/IMAP inside Settings and enable POP for all emails.
When you launch Thunderbird for the first time, it will ask you to enter an email ID and password. Enter your Gmail credentials there. You can also add new email id under Accounts>Set up an account>Email as seen in the screenshot below.
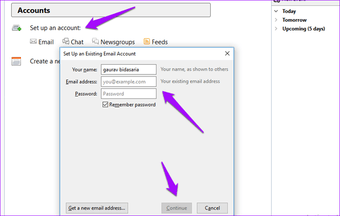
When you hit continue as seen in the above screenshot, Thunderbird will automatically get the necessary port addresses. Click Done and it will create all the folders and sub-folders to begin downloading emails from your Gmail account. It may take a while depending on the size of your Inbox and internet speed.

You may be asked to sign in again and give Thunderbird necessary permissions.
Also Read:
How to Recover Lost/Deleted Data from Android for Free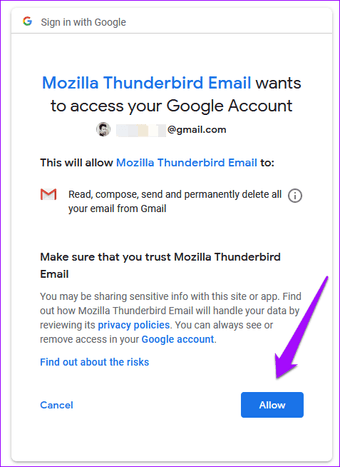
You should now see all the folders in the left panel and your emails on the right. Let it sync your account for some time.

Thunderbird is free, open-source, and cross-platform ready. So rest assured, all your data is safe on your computer. Check the
support page on Gmail POP for emails to explore more about it.
Download Thunderbird2. TRASH BIN
When you receive an email, you may glance at it, and click on the delete button if you find it to be not useful or unworthy of further attention. If you want to recover it later, you can do that, but there are a few limitations involved.
Any email that you delete in Gmail will go to the Trash folder where it will stay for up to 30 days. If you fail to recover emails during that period, Gmail will automatically purge those emails from the Trash folder.
To restore, open Gmail in browser or mobile, open the Trash folder and locate the email you wish to restore to the Inbox folder.
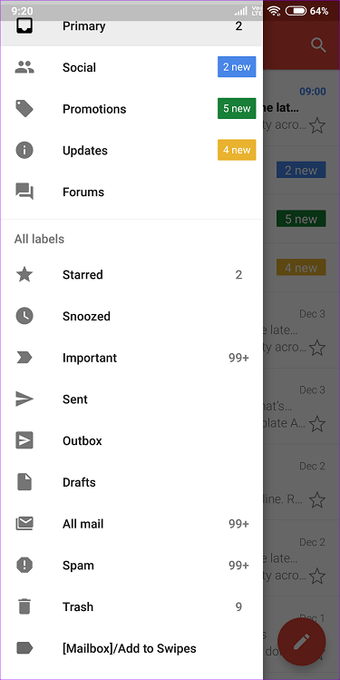

On the mobile, long-press on the email and tap on the white envelope icon to restore the email to the Inbox folder. Of course, you will have to click on the Move To icon (folder with right arrow) to move the email back to the Inbox.
Also Read:
How to Recover Deleted Photos from Any Android Phone3. GOOGLE TAKEOUT
Not many people know about this, but Google offers a way to take out all the data you have on Google's servers and store it locally.
Visit Google TakeoutWhen you land on the Takeout page, you will find that the list is rather long and includes all Google apps and services. For this post, we will focus on Gmail only. Scroll down to find it and click on the drop-down menu. You can either select all emails (which is what I recommend) or select by labels.

Scroll to the bottom of the list and click on Next.
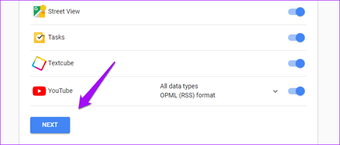
Pick the file type, archive size, and delivery method which can be email or directly in your chosen cloud storage service. You can leave it to default too.

When you click on Create Archive, your data will be compiled and mailed to you within a few hours to a week. The files will be in .MBOX format for which we will need a file viewer. We can either use Thunderbird or MBox Viewer. Since we have seen Thunderbird in action, I will show you how to use MBox Viewer.
Launch MBox Viewer, a Windows-only app so if you are using another OS, go for Thunderbird. Once you are in, select the Google Takeout file.

That’s it, folks. You can now view emails from your Google Takeout Gmail archives whenever you want. You don’t have to install MBox either. Also, MBox Viewer also has a pro version, but the free version should be good enough for you.
Download MBox Viewer4. GMVAULT
Gmvault is a free and open-source software to download and view Gmail emails, but that’s not all. You can schedule backups which eliminates the need to keep taking backups as we saw with earlier methods. You can also use it to move emails to a different Gmail account. Handy!
Download Gmvault for Windows or macOS using the link below. You will begin with enabling the IMAP option under Gmail Settings under Forwarding POP/IMAP tab.

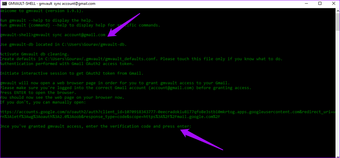
Now, open Gmvault and it will greet you with a command shell line. Don’t get scared. To sync a Gmail email ID, enter the following command:
Also Read:
How to Add a Windows-Like Recycle Bin to Your Android Phonegmvault sync account@gmail.com
You will now have an open tab in your browser requesting you to authorize Gmvault to access your Gmail ID. You'll need log in to your Gmail ID in the browser first.
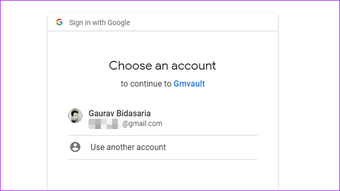
Once you have authorized, go back to Gmvault and simply press Enter on your keyboard. Gmvault will now begin to back up all your emails automatically.
Here are some useful commands that you can use in Gmvault.
Update backup:
gmvault sync account@gmail.com
Check emails from last week only:
gmvault sync -t quick account@gmail.com
Restore emails to another Gmail account:
gmvault restore newaccount@gmail.com
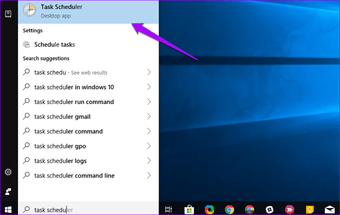
To schedule backups, open Task Scheduler in Windows by searching for it.
Click on Create Task.

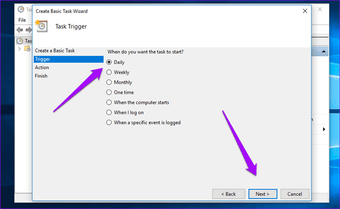
Name your task to help remember it easily and set the Trigger to Daily, Weekly or Monthly as you wish.
Under Action, click on Start a Program and locate the gmvault.bat file that could find at this type of location on your computer: C:\Users\NAME\AppData\Local\gmvault\gmvault.bat
Right underneath, add the following argument.
sync -t quick account@gmail.com

Done! If you want to perform a manual backup without opening Gmvault or check whether the task you have scheduled is working properly, go under Task Scheduler Library and select Gmail task name that you gave earlier. Right-click on it and click on Run. Gmvault should open and begin a backup.
Also Read:
How to Recover Deleted Notifications on Android Phone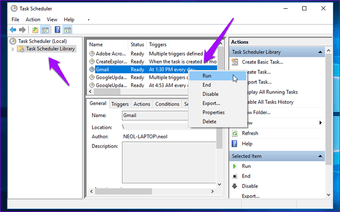 Download Gmvault
PREVENTION IS BETTER THAN CURE
If you deleted an email recently, you could recover it from the trash bin. But that is not possible always. It is better to take a backup of all your Gmail emails before losing out an important email that you may have deleted accidentally. So prepare for it in advance. Following any one of the above methods will let you recover Gmail emails easily with the click of a button.
Next up: Accidentally deleted some important contacts, messages, or photos from your Android phone? Let
Gihosoft Free Android Data Recovery Software help you
recover deleted files from Android phone quickly.
