2019/02/12

How to Check iPhone for Virus or Malware


1#: Top 6 Ways to Check iPhone for Virus or Malware

Malware does exist in iPhone and if you are sure that your device is misbehaving, you should definitely check your iPhone for viruses or malware. If you are thinking how to check iPhone for virus or malware, you can follow the methods given below.
1.Check Battery Performance

Viruses are harmful programs that run in the background. They drain the battery of your iPhone very quickly. So, you need to check the battery performance of your iPhone.

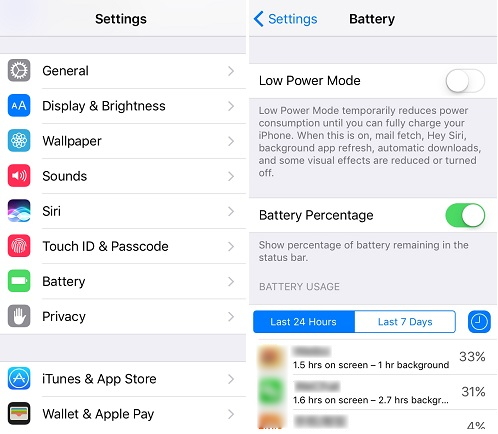
Step 1. Go to Settings and tap on Battery.

Step 2. All the apps with the respective battery usage will be listed.

Step 3. When you tap on Show Detailed Usage, you will get the breakdown of foreground and background usage. If you find an app that you don’t recognize, remove it immediately.

2.Check whether Your iPhone is JailBroken

In the jailbroken iPhone, all the in-built restrictions are removed, making it vulnerable to harmful app installations. Follow the steps given below to check if your iPhone is jailbroken.

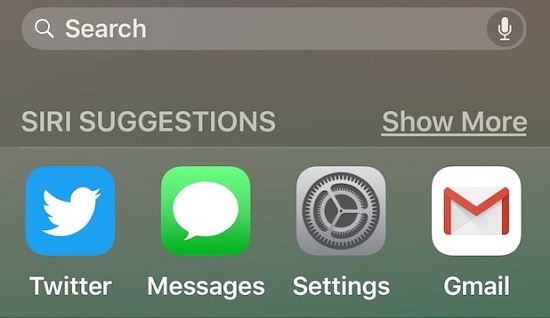
Step 1. Open the Search bar in your device.

Step 2. Enter cydia in the search bar and tap Search. If you find Cydia in your iPhone, your device is jailbroken.

3.Check Crashing Apps

If the apps that you regularly use are suddenly crashing, your device’s privacy has been compromised. Keep all the apps updated to the latest and secure version. Follow the steps below to update the apps.

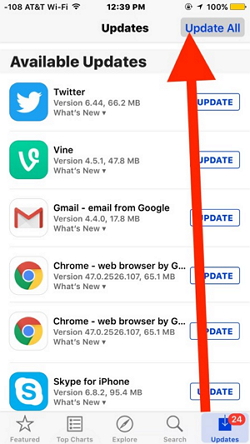
Step 1. Open App Store on your device.

Step 2. If asked, enter the Apple ID and password.

Step 3. If there are any updates available, tap Update All.

4.Check Unknown Apps

The malicious apps look similar to the original apps so you need to be extra careful while checking for unknown apps.

Step 1. Swipe through the screen and look for the apps that you don’t remember installing.

Step 2. If you find an app that looks suspicious, delete it immediately.

Step 3. To see the list of apps that are installed from App Store, tap the Apps icon -> your profile photo -> Purchased. If you have an app on iPhone that doesn’t belong to this list, it is malicious.


5.Check Pop-up Ads in Safari

When there is a sudden surge in the pop-up ads, your device is definitely infected. To be safe, don’t click any of the pop-up ads.

6.Check Unexplained Extra Charges

Viruses use your phone’s data to access the internet and always run in the background. Keep checking your bill statements to ensure that there is no sudden surge in your data usage or messages.
2#: 5 Things to Do after Checking iPhone for Virus/Malware

After checking all the steps above, if you find something suspicious or unknown apps, you need to take actions on this situation.
1.Turn off & Restart your Device

Step 1. Hold down the power button of your device until you see a slider.

Step 2. Slide and turn the iPhone off.

Step 3. To restart, hold down the power button until you see the Apple logo.


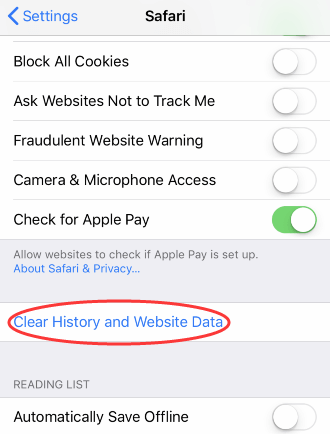
2.Clear History & Website Data

Step 1. Open Settings on your device and tap Safari.

Step 2. Again tap Clear History and Website Data.

Step 3. Confirm by tapping Clear History and Data.

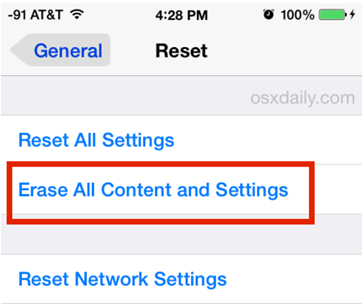
3.Reset Your iPhone as a New One

If nothing works, you need to factory reset your iPhone.

Step 1. Go to Settings -> General -> Reset -> Erase All Contents and Settings.

Step 2. Enter your passcode to confirm the reset.

Step 3. The process will take some time to complete. Then set up your device as a new one.

4.Restore your iPhone from Backup

You can also restore the backup to your device to remove the viruses. You can restore either the iTunes backup or iCloud backup to your iPhone. If the most recent backup is corrupted and if for any reason you are not able to restore, it might contain malware. So, restore one of other backups to your device.


Sponsor ads:

Gihosoft Free iPhone Data Recovery:iphonerecovery.com

Free iPhone Data Recovery Software for Windows/Mac

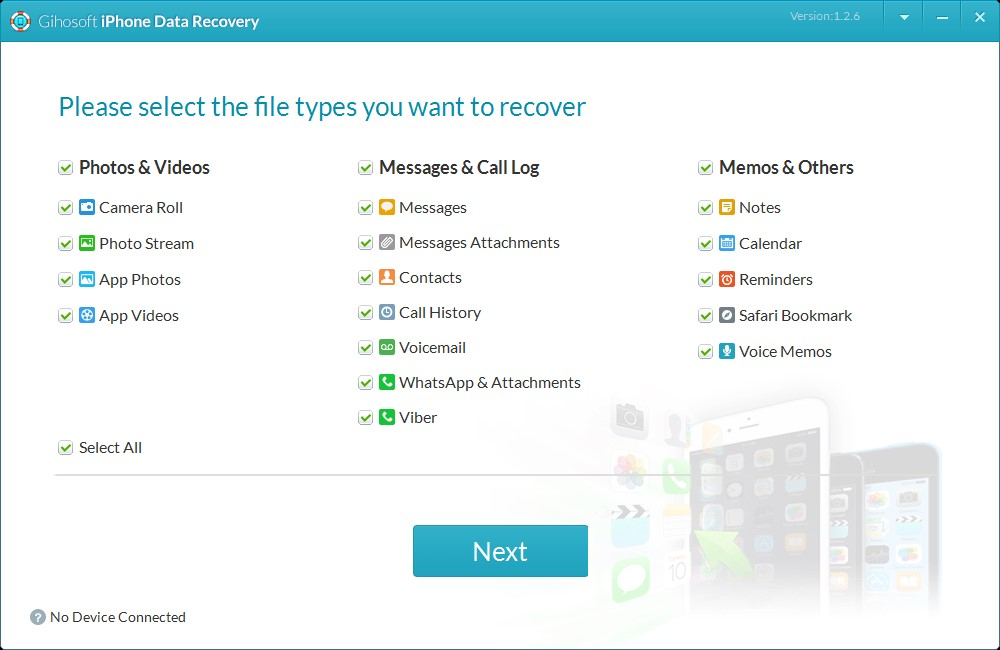
Recover up to 12+ types of files, including contacts, SMS, photos, WhatsApp, Viber, notes, etc.

Restore lost data from iOS devices directly or from iTunes and iCloud backup

Recover iPhone data lost due to iOS upgrade/jailbreak, accidental deletion, device lost or broken

Support all the latest iPhone, iPad and iPod Touch

Both Free and Pro version.

If you lost data after you updated to a new iPhone, you can always use Gihosoft iPhone Data Recovery to get the data back from the old iPhone or backup.

Top 10 Best FRP Bypass Tools to Bypass Google Account on Android Device 2019

Worth reading:download youtube 1080p

If you use android phones, please choose Gihosoft Android Data Recovery


Jihosoft Android Data Recovery: the best Android Data Recovery software for Windows and Mac to recover deleted contacts, messages, photos, videos, WhatsApp and etc from Android


2019/01/31

How to Share Files Between Android and PC Without Internet 2019


WHAT’S THE SECRET

No hidden manifesto exists. We will just be taking advantage of Wi-Fi Direct technology. When you hear Wi-Fi, it’s usually synonymous with the internet, but Wi-Fi Direct is a Wi-Fi standard which doesn’t require an internet connection. It creates a Peer-to-Peer connection without using any Wi-Fi router and works almost like Bluetooth but with faster data transfer rates.


Wi-Fi Direct makes your device a portable virtual router that can be used to connect printers, mobile phones, PCs and more. However, the technology currently doesn’t support direct transfer of files without using apps.
WHAT TO DO

Fortunately, two ways exist — use third-party apps and native hotspot with FTP server. Let's check them out.
Third Party Apps

Most apps on Play Store that let you transfer files require a working internet connection. Thankfully, some of these apps come with the ability to take advantage of Wi-Fi direct too.

To name a few worthy apps, we have SHAREit, Xender, and Zapya. For this tutorial, I will be showing you the steps with the Xender app.

Sponsor ads:

Gihosoft Free iPhone Data Recovery:iphonerecovery.com

Free iPhone Data Recovery Software for Windows/Mac

Recover up to 12+ types of files, including contacts, SMS, photos, WhatsApp, Viber, notes, etc.

Restore lost data from iOS devices directly or from iTunes and iCloud backup

Recover iPhone data lost due to iOS upgrade/jailbreak, accidental deletion, device lost or broken

Support all the latest iPhone, iPad and iPod Touch

Both Free and Pro version.

If you lost data after you updated to a new iPhone, you can always use Gihosoft iPhone Data Recovery to get the data back from the old iPhone or backup.

Top 10 Best FRP Bypass Tools to Bypass Google Account on Android Device 2019

Worth reading:download youtube 1080p

Jihosoft Android Data Recovery: the best Android Data Recovery software for Windows and Mac to recover deleted contacts, messages, photos, videos, WhatsApp and etc from Android


If you use android phones, please choose Gihosoft Android Data Recovery

2019/01/15

How to Schedule Post on Instagram


So, the best way to manage your any account is constant posting from time to time. As you might have heard this phrase “Consistency is the key”. But being consistent on Instagram sometimes sure gets tough. So, here’s where this article comes to your rescue! As in this article, we will teach you how you can easily schedule your post on Instagram, and then it will get posted automatically without any hassle or manual work. So, if you are a busy bee but want the perfect consistency on your account to not disappoint your audience then just follow the steps that are mentioned down below.
How to schedule Post on Instagram (for business profile):
Step 1: Convert your account to a business profile:

Aside from direct publishing, business profiles on Instagram can access some useful advanced features. For instance, Instagram insights will show you when your followers are online, also what city they live in, their age, and gender. These factors will help you to promote your products with better details about your target audience. Also, you get a contact button in your profile which makes it easy for your consumers to reach you.


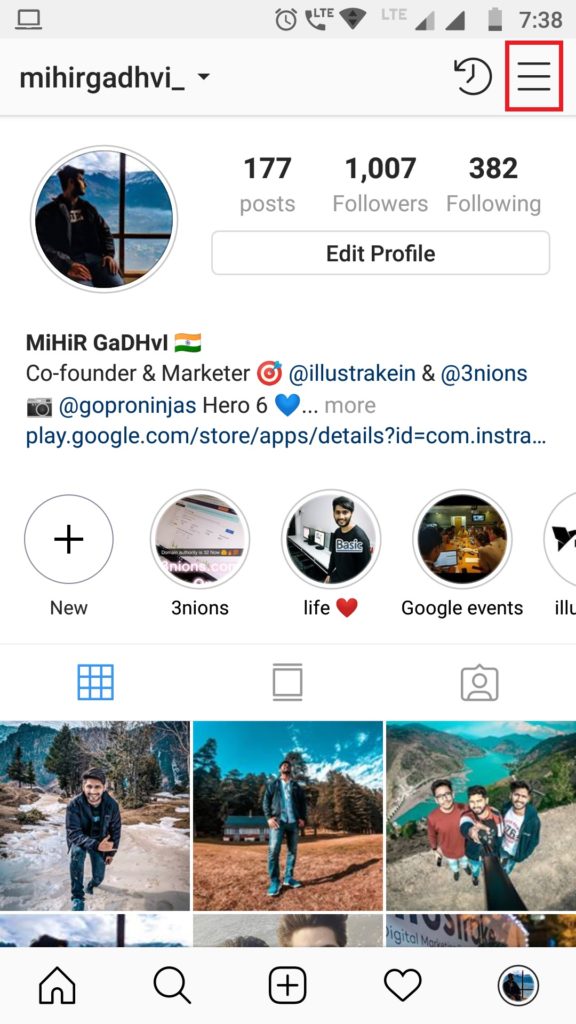
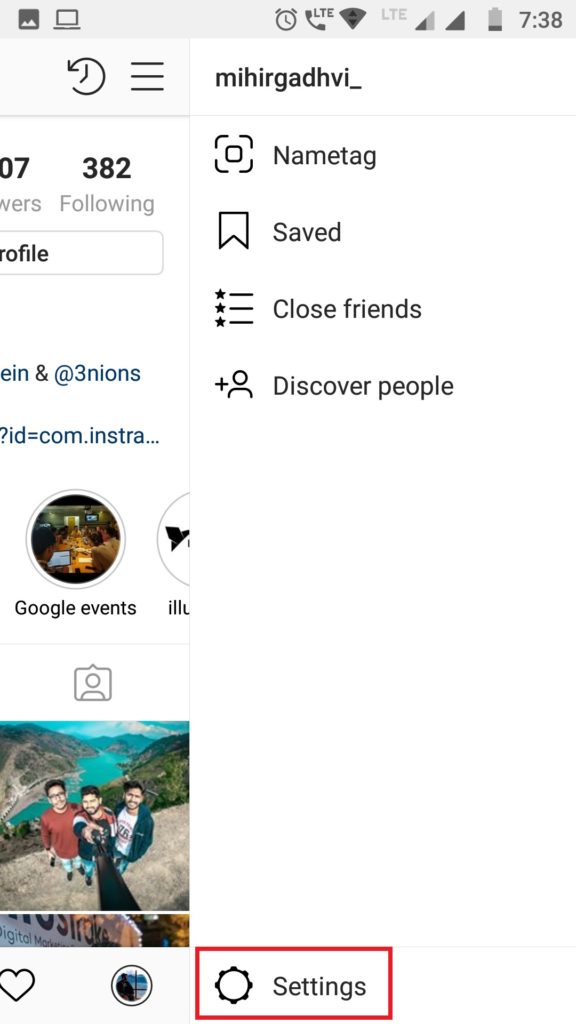
Go to your Instagram profile and tap on the three horizontal lines from the right-hand side corner.


Now go to “Settings” and click on the option of ‘Switch to Business Account’.


Instagram will then prompt you to connect to a Facebook business page ( you need to have admin access to the Facebook page or you can create one new).


After selecting a page, choose a category for your business so that people know what your business is about.


Fill out your contact details (email address, phone number, and address). You need to fill out at least one of these.


Next, tap done! And just like that your Instagram account is now converted to a business profile.

Note: For letting this process to work, make sure your Instagram account is set to public.
Step 2: Add your Instagram account to the Hootsuite application:


Install and open the Hootsuite application from Google Play Store.


Sign up or log in with your Facebook, Google, or directly from your email account.


Next, tap on the profile icon and select “Add Social Network”.


After that tap on the “+” sign from the upper right corner.


Then you will get a number of social media options, tap on “Connect to Instagram”.


Next, enter your credentials and log in.

That’s it now your Instagram profile is added to Hootsuite.
Step 3: How to schedule your post:


Once your Instagram account is linked with Hootsuite application, now go main menu and tap on “Streams”.


Then you will get two options, My Posts, and Scheduled Posts. Tap on “Scheduled Posts” and click on the create icon from the bottom right corner. (In “My posts” you will see the Instagram posts of your added account).


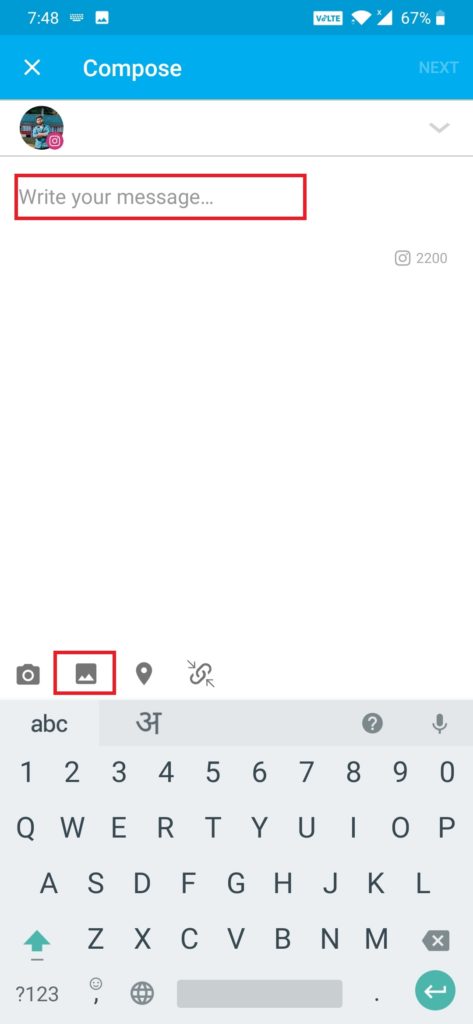
Now, select your account and then normally as you post, write the caption, add a location, and then add the image or video.


Tap on “Next” and then you will get three options, Send Now, Auto-Schedule, Custom Schedule. Now for scheduling your posts, either click on “Auto schedule” or “Custom schedule”.


If you tap on Custom schedule, you will get a calendar to set the date and then a clock to set time. But if your option is Auto schedule, then the application will itself schedule it on the best date and time as per your profile engagement.

If you want to edit or delete your scheduled posts you can still do it, by tapping on “View in Publisher, and then you will get the said options at the bottom of your screen.

Note: If you’re publishing an album of photos or video, you’ll still need to manually complete the posting process when the time comes.

That’s it, now with the above-mentioned steps, you can easily schedule your Instagram posts on your preferred date and time. So, no more hovering over your phone and waiting for the right time to come! As now you can custom your own timing and set whichever suits you the best. But if you’re confused, then don’t worry let the application pick the perfect timing for you.

Sponsor ads:

Gihosoft Free iPhone Data Recovery:https://www.gihosoft.com/iphone-data-recovery-free.html

Gihosoft iPhone Data Recovery Free

Free iPhone Data Recovery Software for Windows/Mac

Recover up to 12+ types of files, including contacts, SMS, photos, WhatsApp, Viber, notes, etc.

Restore lost data from iOS devices directly or from iTunes and iCloud backup

Recover iPhone data lost due to iOS upgrade/jailbreak, accidental deletion, device lost or broken

Support all the latest iPhone, iPad and iPod Touch

Both Free and Pro version.

If you lost data after you updated to a new iPhone, you can always use Gihosoft iPhone Data Recovery to get the data back from the old iPhone or backup.You may also like: iphonerecovery.com

If you use android phones, please choose Gihosoft Android Data Recovery.

With Gihosoft Android Data Recovery, no longer afraid of data loss!

Must read:Youtube video downloader for pc

Gihosoft RePicvid Free Photo Recovery Software provides a free photo recovery software for windows to help users recover the deleted or lost photo for free.

Jihosoft Android Data Recovery: the best Android Data Recovery software for Windows and Mac to recover deleted contacts, messages, photos, videos, WhatsApp and etc from Android devices.Tips:How to transfer messages from iPhone to iPhone


jihosoft Free iPhone Data Recovery

2018/12/17

How to Fix iPad Not Charging Issue


1. Check Your iPad Charging Cable And Charger

The only way by which you can charge your iPad is through the charging cable by using a charger. So start by first examining the charger as well the USB cable which is used for charging the iPad to check for any damages. After this, try using another charger and charging cable and try charging your iPad again.
2. Clean Up The Charging Port

The USB charging port in your iPad over the time might accumulate dirt, dust, debris or lint. This accumulation might be causing bad connection to the charging USB cable. Try cleaning this charging port using some soft cotton swab carefully. Make sure that you don’t damage the charging port permanently.
3. Reboot Your iPad And Try Again

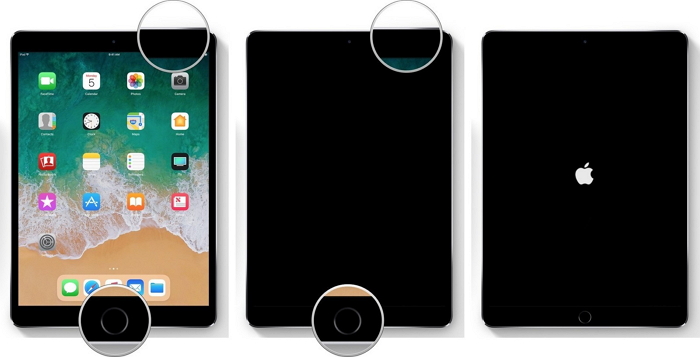
You can force restart your iPad and try to charge it again. To perform a force restart on your iPad, follow the steps below.

Step 1.Press the “Home” button and hold it.

Step 2.While pressing the “Home” button, press the “Sleep/Wake” button and hold it till the Apple logo appears.


Your iPad will switch off and switch on again and after rebooting you can expect that the issue of iPad says not charging will be fixed.

Sponsor ads:

Gihosoft Free iPhone Data Recovery:https://www.gihosoft.com/iphone-data-recovery-free.html

Gihosoft iPhone Data Recovery Free

Free iPhone Data Recovery Software for Windows/Mac

Recover up to 12+ types of files, including contacts, SMS, photos, WhatsApp, Viber, notes, etc.

Restore lost data from iOS devices directly or from iTunes and iCloud backup

Recover iPhone data lost due to iOS upgrade/jailbreak, accidental deletion, device lost or broken

Support all the latest iPhone, iPad and iPod Touch

Both Free and Pro version.

If you lost data after you updated to a new iPhone, you can always use Gihosoft iPhone Data Recovery to get the data back from the old iPhone or backup.You may also like: iphonerecovery.com

If you use android phones, please choose Gihosoft Android Data Recovery.

With Gihosoft Android Data Recovery, no longer afraid of data loss!

Gihosoft RePicvid Free Photo Recovery Software provides a free photo recovery software for windows to help users recover the deleted or lost photo for free.

Jihosoft Android Data Recovery: the best Android Data Recovery software for Windows and Mac to recover deleted contacts, messages, photos, videos, WhatsApp and etc from Android devices.

jihosoft Free iPhone Data Recovery


Worth reading:Best youtube downloader online download youtube 1080p


2018/12/16

How to Recover Deleted Emails from Gmail


We mostly use Gmail as our preferred email provider. Even those who rely on other means like IMAP email accounts of custom domains have a Google account and use Gmail in some capacity. With the number of emails that we get daily, it is easy to delete an email only to realize its importance later. So the question is how do you recover deleted emails? Backups.


A simple search on Google will tell you about the numerous horror stories where Gmail accounts of users were deleted. Another reason to take a backup is the high-profile hacks that the likes of Facebook, Microsoft, Google, and recently Quora, have faced in the past five years. So do you want to take your chances with Gmail? Here's what a famous fictional character said:

I know we’re not perfect, but the safest hands are still our own - Captain (America) Steve Rogers


Also Read: How to Recover Deleted Contacts from Gmail


Okay, that's dramatic enough. Let’s get a bit serious and look at some of the ways by which you can take a backup of emails on Gmail.
1. THUNDERBIRD

There are many email clients available for desktop, but I will be using Thunderbird for this guide. Why? Because it simply works. Also, there is a portable version available for you to save all your data on a pen drive and view it offline.

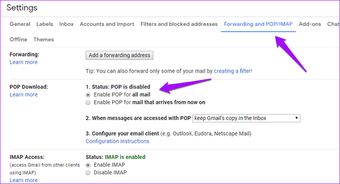
To take a backup of Gmail emails, go to Forwarding and POP/IMAP inside Settings and enable POP for all emails.


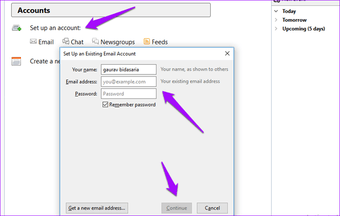
When you launch Thunderbird for the first time, it will ask you to enter an email ID and password. Enter your Gmail credentials there. You can also add new email id under Accounts>Set up an account>Email as seen in the screenshot below.


When you hit continue as seen in the above screenshot, Thunderbird will automatically get the necessary port addresses. Click Done and it will create all the folders and sub-folders to begin downloading emails from your Gmail account. It may take a while depending on the size of your Inbox and internet speed.


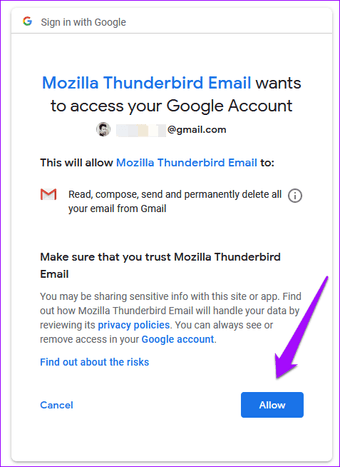
You may be asked to sign in again and give Thunderbird necessary permissions.

Also Read: How to Recover Lost/Deleted Data from Android for Free


You should now see all the folders in the left panel and your emails on the right. Let it sync your account for some time.


Thunderbird is free, open-source, and cross-platform ready. So rest assured, all your data is safe on your computer. Check the support page on Gmail POP for emails to explore more about it.

Download Thunderbird
2. TRASH BIN

When you receive an email, you may glance at it, and click on the delete button if you find it to be not useful or unworthy of further attention. If you want to recover it later, you can do that, but there are a few limitations involved.

Any email that you delete in Gmail will go to the Trash folder where it will stay for up to 30 days. If you fail to recover emails during that period, Gmail will automatically purge those emails from the Trash folder.

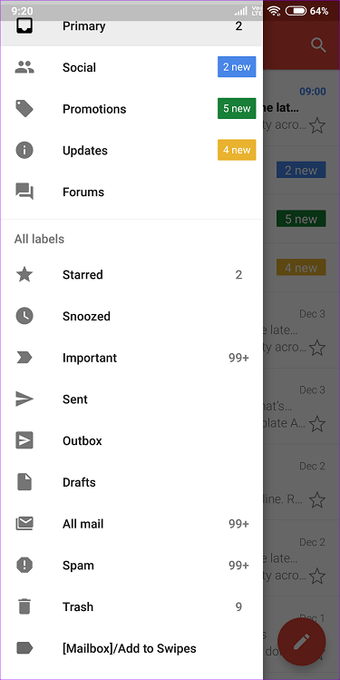
To restore, open Gmail in browser or mobile, open the Trash folder and locate the email you wish to restore to the Inbox folder.


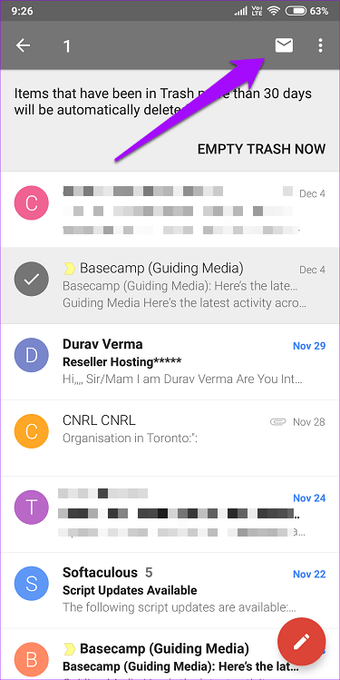
On the mobile, long-press on the email and tap on the white envelope icon to restore the email to the Inbox folder. Of course, you will have to click on the Move To icon (folder with right arrow) to move the email back to the Inbox.

Also Read: How to Recover Deleted Photos from Any Android Phone
3. GOOGLE TAKEOUT

Not many people know about this, but Google offers a way to take out all the data you have on Google's servers and store it locally.

Visit Google Takeout

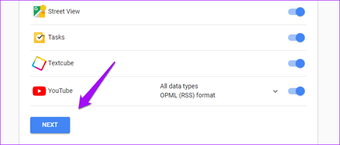
When you land on the Takeout page, you will find that the list is rather long and includes all Google apps and services. For this post, we will focus on Gmail only. Scroll down to find it and click on the drop-down menu. You can either select all emails (which is what I recommend) or select by labels.


Scroll to the bottom of the list and click on Next.


Pick the file type, archive size, and delivery method which can be email or directly in your chosen cloud storage service. You can leave it to default too.


When you click on Create Archive, your data will be compiled and mailed to you within a few hours to a week. The files will be in .MBOX format for which we will need a file viewer. We can either use Thunderbird or MBox Viewer. Since we have seen Thunderbird in action, I will show you how to use MBox Viewer.

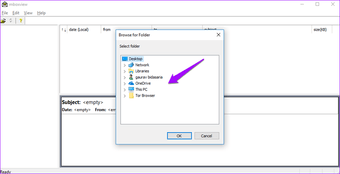
Launch MBox Viewer, a Windows-only app so if you are using another OS, go for Thunderbird. Once you are in, select the Google Takeout file.


That’s it, folks. You can now view emails from your Google Takeout Gmail archives whenever you want. You don’t have to install MBox either. Also, MBox Viewer also has a pro version, but the free version should be good enough for you.

Download MBox Viewer
4. GMVAULT

Gmvault is a free and open-source software to download and view Gmail emails, but that’s not all. You can schedule backups which eliminates the need to keep taking backups as we saw with earlier methods. You can also use it to move emails to a different Gmail account. Handy!

Download Gmvault for Windows or macOS using the link below. You will begin with enabling the IMAP option under Gmail Settings under Forwarding POP/IMAP tab.


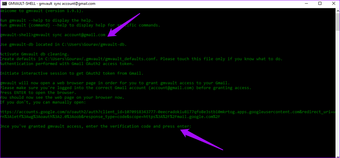
Now, open Gmvault and it will greet you with a command shell line. Don’t get scared. To sync a Gmail email ID, enter the following command:

Also Read: How to Add a Windows-Like Recycle Bin to Your Android Phone

gmvault sync account@gmail.com

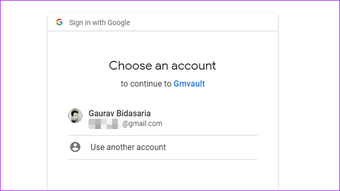
You will now have an open tab in your browser requesting you to authorize Gmvault to access your Gmail ID. You'll need log in to your Gmail ID in the browser first.


Once you have authorized, go back to Gmvault and simply press Enter on your keyboard. Gmvault will now begin to back up all your emails automatically.


Here are some useful commands that you can use in Gmvault.

Update backup:

gmvault sync account@gmail.com

Check emails from last week only:

gmvault sync -t quick account@gmail.com

Restore emails to another Gmail account:

gmvault restore newaccount@gmail.com

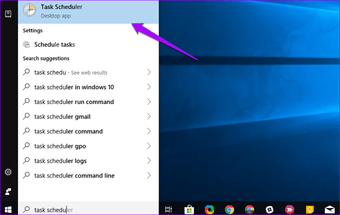
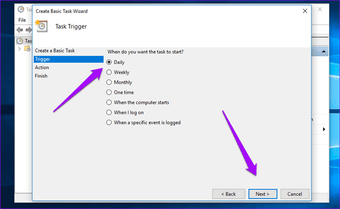
To schedule backups, open Task Scheduler in Windows by searching for it.


Click on Create Task.


Name your task to help remember it easily and set the Trigger to Daily, Weekly or Monthly as you wish.


Under Action, click on Start a Program and locate the gmvault.bat file that could find at this type of location on your computer: C:\Users\NAME\AppData\Local\gmvault\gmvault.bat

Right underneath, add the following argument.

sync -t quick account@gmail.com


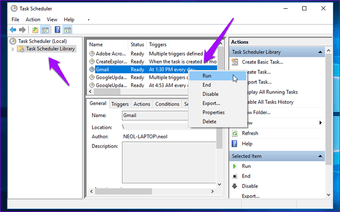
Done! If you want to perform a manual backup without opening Gmvault or check whether the task you have scheduled is working properly, go under Task Scheduler Library and select Gmail task name that you gave earlier. Right-click on it and click on Run. Gmvault should open and begin a backup.

Also Read: How to Recover Deleted Notifications on Android Phone


Download Gmvault
PREVENTION IS BETTER THAN CURE

If you deleted an email recently, you could recover it from the trash bin. But that is not possible always. It is better to take a backup of all your Gmail emails before losing out an important email that you may have deleted accidentally. So prepare for it in advance. Following any one of the above methods will let you recover Gmail emails easily with the click of a button.

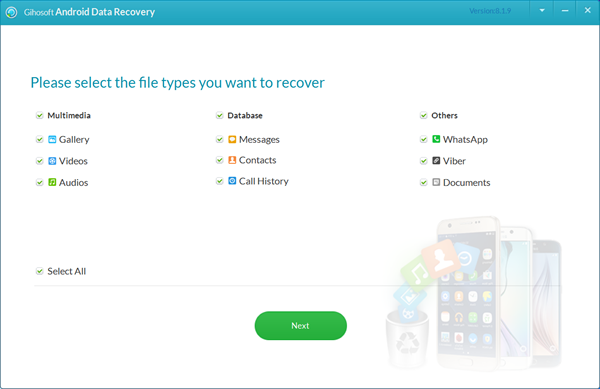
Next up: Accidentally deleted some important contacts, messages, or photos from your Android phone? Let Gihosoft Free Android Data Recovery Software help you recover deleted files from Android phone quickly.


2018/10/17

How to securely erase your Android device in 4 steps 2019


It's an inevitable moment in the smartphone-owning cycle, the point at which a newer, shinier model comes along and your trusty old device is no longer needed.

Maybe your company bought you a new Android phone. Maybe your old one was getting too slow. Or maybe you just love electronics and couldn't resist the lure of whatever sexy new Android device your favorite manufacturer started selling.


Further reading: How to Recover Deleted Files from Android


Whatever the case, it's common nowadays to find yourself with an extra phone. And while there are plenty of practical uses for an old Android device, there's also a time when the best choice is to sell, donate, or otherwise pass it along.
Before you do so, though, you'll want to be sure you've securely erased it and removed any traces of your past – because the last thing you'd want is for your phone's new owner to resurface your personal or corporate data.

Follow the four steps below and you can let your Android device go without worry.

TABLE OF CONTENTS


1: Make sure your Android device is encrypted

2: Remove your SIM card and any storage cards


3: Perform a factory reset to fully erase your device


4: Remove any remaining account associations
1: Make sure your Android device is encrypted

The biggest fear with wiping an Android device is the improbable but not impossible prospect of someone later using data recovery tools to find and assemble lingering bits of data.

That's why the first and most important step in securely erasing your Android device is to encrypt its local storage. That way, even if your phone makes its way into the hands of a shady character – and even if said scoundrel is able to recover the data you've erased – your sensitive info will remain virtually unreadable.


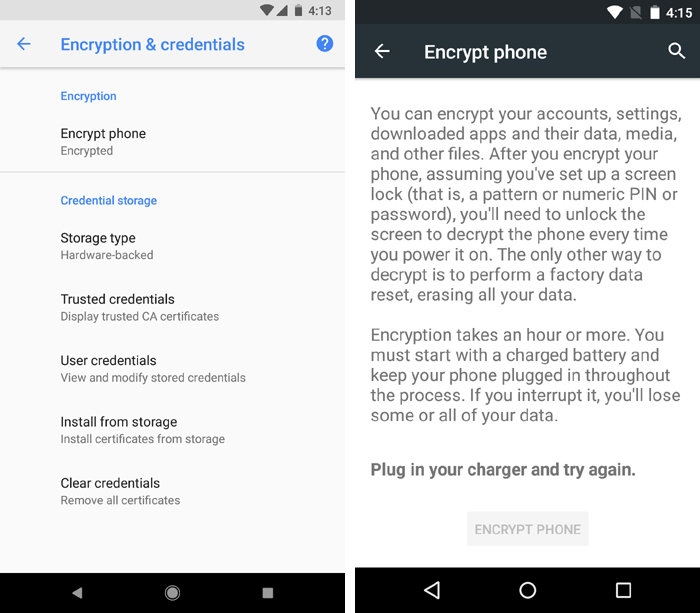
If your phone is relatively recent, there's a good chance it's already encrypted by default. But it's worth double-checking to make sure.


Head to the Security section of Android's system settings and look for the option labeled "Encryption." (The exact wording and placement may vary depending on your device's manufacturer and Android version, but it should be pretty easy to spot.) There, you'll be able to see if your phone is in fact already encrypted – and to start the encryption process if it isn't.

Google

The visuals will vary from one Android version to another, but your phone will either show you that it's encrypted or give you an option to encrypt it.

Be warned that the actual encryption process may take a while, and you won't be able to use your device while the process is under way. Once it's done, though, you can rest easy knowing your data has a powerful layer of protection from prying eyes in the unlikely event that it's even recovered.
2: Remove your SIM card and any storage cards

Now that your data is secure, take a moment to confirm that your carrier-issued SIM card and any external memory cards are removed from your device. (Not many devices have SD card slots these days, so don't fret if you don’t find one.)

Both cards can be tied to your identity and filled with private data, and there's no reason to keep either of them in a device that’s leaving your possession.


3: Perform a factory reset to fully erase your device

This part is the actual wipe of your Android phone: Go back into the system settings and look for a section called "Backup & reset." If you don't see that, try opening the System section and then look for either "Backup & reset" or just "Reset."

Find and select the option to perform a factory data reset and select any subsequent options to erase all types of data and accounts. The system will likely give you a confirmation screen or two and then ask you to input your PIN, pattern, or password for protection. Complete all those tasks, then sit back and wait while Android does its work.

Tips: Lost data after factory reset? Let Gihosoft Free Android Data Recovery Software help you get them back quickly.
4: Remove any remaining account associations

Last but not least, take a moment to manually remove the phone from your Google account and any other accounts that might be associated with it.

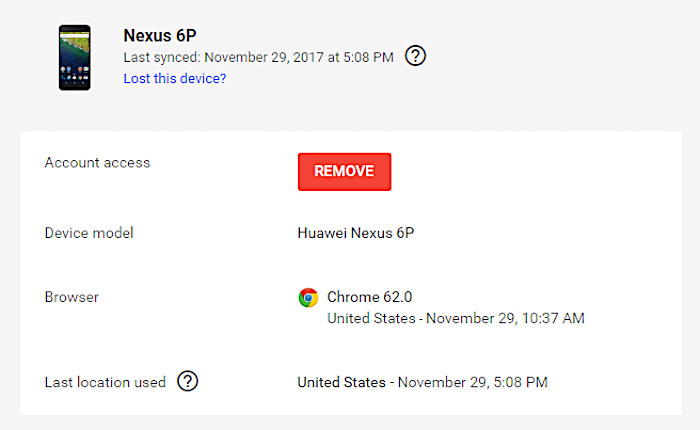
For Google, just visit this page, find the device in the list, then click it and click the red "REMOVE" button that appears. That'll ensure your Google account has no lingering connection to it.

Google

Severing the connection between a phone and your accounts is a smart final step to take.

Also Read: Top 5 Causes of Android Data Loss and How to Prevent It


Think through any other services that might have similar options – password managers like 1Password, Dashlane or LastPass, for instance, or multi-device authentication apps like Authy – and sign into their respective websites to sever any remaining connections.

And with that, you're all set: Your Android phone is securely erased and ready to move onto its new life.

2018/10/10

How to Wipe Locked iPhone with Synced iTunes 2019 Guide


How to Wipe Locked iPhone with Synced iTunes

If you synced your locked iPhone to iTunes before, you can use it to restore your iPhone. It won’t require any passcode. But if iTunes do ask for passcode during the process, this way is not available for you.


Go to iTunes on your PC.


Connect your iPhone to the PC via a USB cable or use the one made with your device.


Wait for iTunes to sync and back up your iPhone automatically.


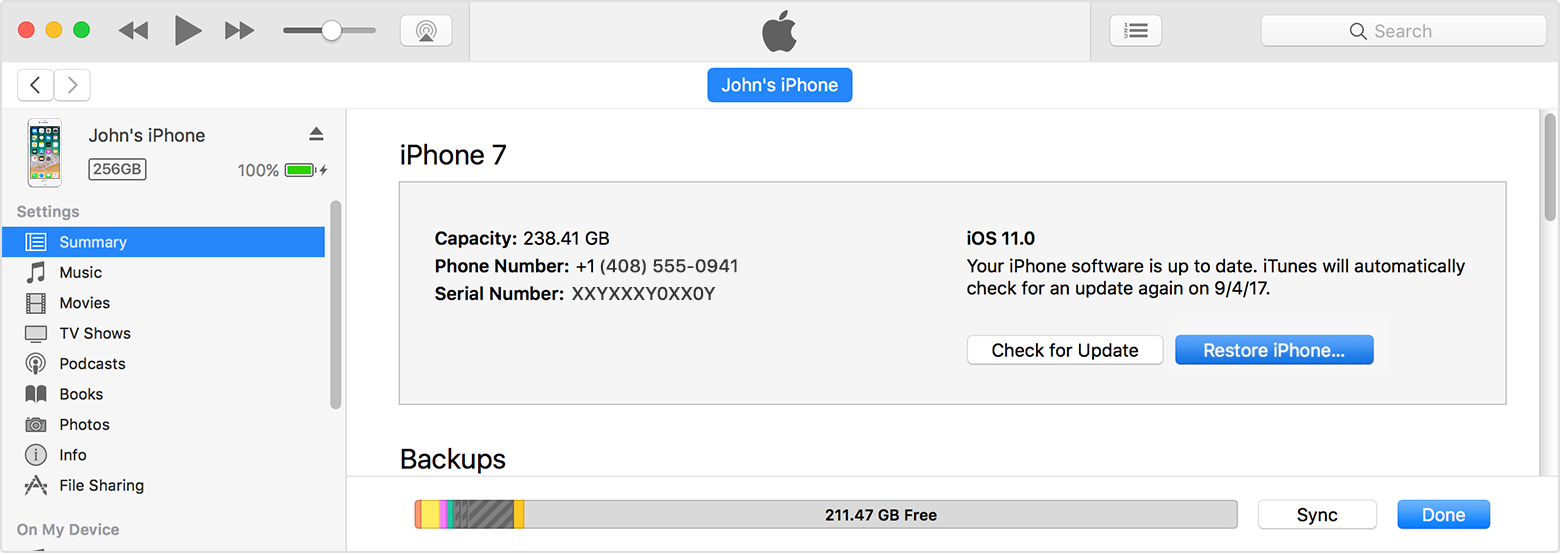
When it’s done, go to the Summary page on iTunes. Click “Restore iPhone...” tab.


Confirm your intention again by clicking Restore.


Done.


Note that the above steps will restore your iPhone to factory setting and you can then set it up as new.
How to Wipe a Locked iPhone via Find My iPhone

You can also wipe locked iPhone via Find My iPhone. This is Apple's own solution but comes with some limitations. However, let us look at the steps to wipe iPhone using ‘Find My iPhone.’


Go to icloud.com on your device or computer.


Log in with your Apple ID and passcode.


Locate “Find iPhone” and click.


Locate “All Devices” and click.


Select the device you want to wipe.


You will find “Erase iPhone” on the device’s info window, click it.


The iPhone will be wiped if you were online or wipe later when you are connected to the internet.


Limitations:


No free access. Apple ID passcode required.


If Find My iPhone is not set up previously, it can’t be wiped.


Your locked iPhone should be connected to internet.

Gihosoft Photo Eraser Erase unwanted objects and perfect your amazing photos!

If you lost data after you updated to a new iPhone, you can always use Gihosoft iPhone Data Recovery to get the data back from the old iPhone or backup.

Jihosoft Photo Eraser

Free iTunes/iPhone Backup Extractor for iPhone, iPad

iPhone Backup Extractor - Extract Data from iPhone Backup

You may also like:online youtube downloader

The Best Power Supplies for 2023

  The Best Power Supplies for 2023  Here are some recommendations for the best power supplies in 2023: • Corsair RM/RMx Series - High-end 80...